We are going to dive into cut outs!, cut outs is mostly used by ACBA artists. Today, we are going to discuss about the usage of cutout to replace diorama.
No dio? No problem
There are a couple of things you can do when you don’t have access to diorama, you can shoot outdoor and you can also be very creative and start incorporating household items or use a cut out. But, we are not going to discuss shooting outdoor in this entry as i have talked about it previously. Rather, we are going to dive into utilising cut out to create a display.
By utilising cut outs to create a display from scratch can help your work to resemble more of a comic page than a photography. When done right, it can be mesmerising and very pleasing to look at, at least, i think so!
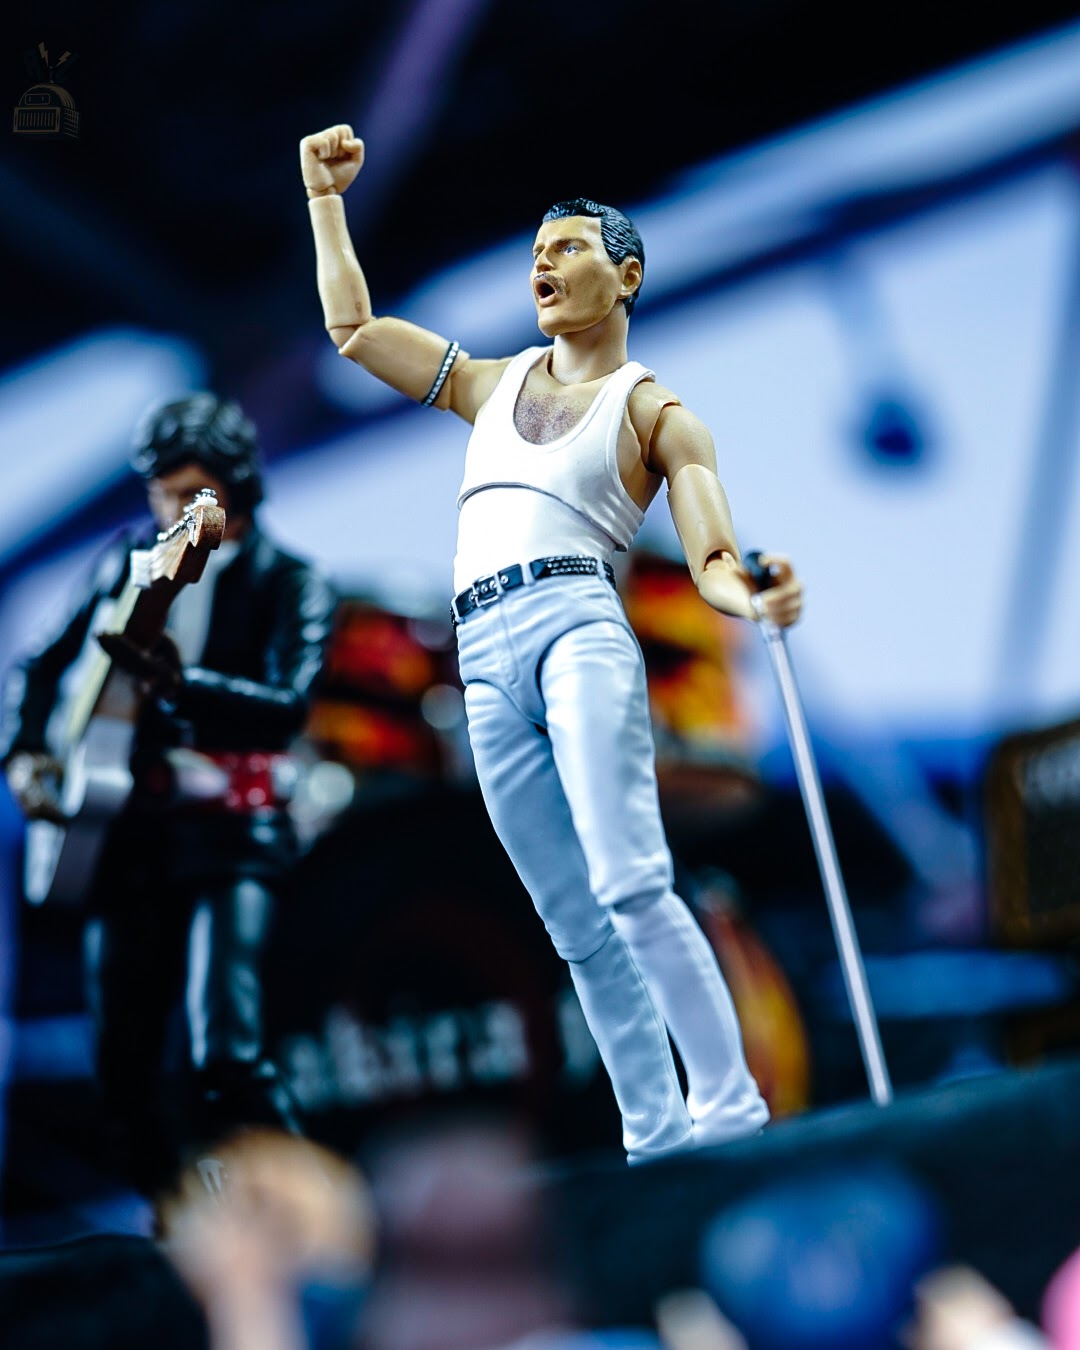
No diorama used to create this display. This was all done with using 3 different cutouts and TV as background. The tricky part is actually blending the diorama with the overall display, for this you will need RGB lights and sound knowledge on lighting.
However, doing this isn’t as simple as just finding the right cut out and right placement. It requires your ability to match the lighting and blend the cut outs to bring it as a whole piece without it looking out of place. For example, it took me days to find the right balance for the picture below.
For further in depth and behind the scene of my work as pictured above, feel free to check out the video below
I have been a bit occupied recently in trying to start up a merch shop for you guys, it turned into a full on original designed stuffs, which could be a bit serious. Anyway, check out my shop on ig @akirajo_shop, please share and follow.
Thank You For Reading and it’s been a pleasure, keep grinding and innovating, as a wise man once said
“In The Pursuit of excellence, there is no finish line”
Komorebi, the Japanese expression for the sunlight as it filters through the trees, is made up of the kanji characters for tree (木), shine through (漏れ), and sun (日).
Light rays appear when there’s something in the air for them to bounce off of. Smoke, fog, dust particles, steam… Any light source captures it and creates a ray of light. When shooting indoors, fog is the most practical.
So, you will need dust particles which can be simulated by using either fog machine or atmosphere spray and as well as a strong light to be able to able to create that rays.
Note that a different types of lights are needed here, light that are very strong and focused. Lumecube and ulanzi l1 or l2 are perfect for this type of shots.
Ideally you want the background to be a little bit dark to make it easier but doesn’t mean that it doesn’t work on a day scene, just means u need a very strong light.
This particular shot was done with a lumecube equipped with its barn door accesorry to mimic the spotlight on a stage. This shot is done with the same principle as light rays, where i needed atmosphere to hightlight the rays.
here is a couple of video tutorial example of doing ray of lights
Glass technique is one of many techniques one can use to produce action shots such as flying, jumping and even running. What we mean by “Glass technique” is you grab a piece of glass and place your figure so it looks like flying or jumping. It is quite a tricky one as you need to watch out for reflections and even dusts as it can ruin your shot.
Glass technique is one of many techniques one can use to produce action shots such as flying, jumping and even running. What we mean by “Glass technique” is you grab a piece of glass and place your figure so it looks like flying or jumping. It is quite a tricky one as you need to watch out for reflections and even dusts as it can ruin your shot.
To better explain the technique, i think it is better that i give an example on how to use the glass technique, so here we go.
Equipment S.H Figuarts Captain Marvel A piece of glass 2x Usb Led lights lume cube Figure used : SHF Captain Marvel
camera : Sony a7, lens Tamron 28-75mm f/2.8
The idea is to capture Captain Marvel in flight without the use of editing software. First, we need a piece of clear glass. and set it up as pictured below at an angle. Two usb leds for lights to blend with the background and since the figure is facing down, you will need another source of light to give more light. In this case, i used a lume cube.
Things you need to watch out for when using a glass is that make sure your glass is clean and also watch out for reflections.
since i wanted some sort of trails as she flies by, i light painted the “trail”. At this point, we need more light so i adjusted my camera setting and re-do the trail effects. At this point, we are all doing trial and error here.
I added a few more variations to see if there is a better angle or pose.
I finally settled on the final shot and as you can see the trail effect looks decent and the lighting and as well as the colours are on point. Even though there is a scratch on my glass that i couldn’t get rid off but i think it works a bit as a sort of space dust or something like that.
This is just an example and i will do more examples in the future as we will dissect more of my shots.
Cut outs usage are associated with Articulated Comic Book Art, which focuses on tangibility and hence the usage of cut outs are becoming its signature. Cut outs are used with the intention of making it look like a comic book page, the dialogs between characters, the onomatopoeia used to create sound effects and even something such as a character or the face and your imagination is the limit.
Speech Bubbles
“Straighten your cut-out,bro”
akira jo
Speech bubbles are one of the most trickiest cut outs to incorporate into a picture. The reason is that it has to be straight, then the placement also has to really look like its going out of the mouth.
In the picture above, you will notice that the cut outs are straight and the speech looks like it comes out of his mouth. This is something that you must always ensure when using a speech bubble, it is the only one cutouts that sort of have a rule to it.
Effects Sounds
“Can you read it?”
akira jo
We all love a good sound effects that gives our picture a bit of sauce, effect sounds doesn’t have a rule other than just make sure that it is readable, the whole point of it is that, it has to be able to be read.
Although the effect is “blurred” it is still acceptable as the audience can still read the sound effect. Ideally, you would want it to be in focus, but it is acceptable to be not in focus.
Accessories
Using cut outs as an accessory or part of the set up is also a very interesting to do, such as trees, cars, smokes and so on.
In this picture, i use a total of 4 cut outs. The smoke effects behind iron man and also the damaged cards at the back as part of the background.
The guys at the back are actually cut outs to substitute the lack of figures (at this time, the rest of the cast hasn’t been released yet).
So, there it is, tips on using cut-outs on your work. Keep grinding!
So, you feeling uninspired? you don’t feel like creating something? or you are stuck and the idea on your head doesn’t translate to your work? If you have ever felt this way, then this particular entry is maybe for you.
Feeling Uninspired
“time to explore and grow”
akira jo
When you feel uninspired and don’t feel like doing anything, what should you do? the answer is, you should do absolutely nothing and go on and enjoy doing something else. It just means you are tired, you feel like you have taken the same shots before. Everyone has experienced it, especially when you are posting your work on social media and keep it up everyday, it can be really exhausting, i know. Just take a rest, watch a movie, take a nap, go on holidays, just don’t stress because it shouldn’t be stressful and also you shouldn’t be forcing nor rushing art.
For me, whenever i feel uninspired, i would simply take a rest. After taking a rest, I would read on photography basics, understanding what i don’t before, i would also review all of my work and see how much have i improved or have i improved? is there any technique or tricks that i haven’t mastered? is there anything else that i wanted to do? Usually, by thinking, i would get inspired again in no time.
But you can also prevent or at least maximise your creativity, you must always stay fresh. It’s always time to explore and grow, i keep changing my set up, my lightings, the way i do thing in general and always trying out new techniques or even perfecting the basics. That’s why you might notice, that i keep switching from kaiju photography to 1/12 and sometimes i even do die cast and sometimes even a simple close up.
“Do your shopping”
akira jo
Take as long as you need to rest and to be fresh, usually about the time when your new figure arrives hahaha. In all seriousness, a new figure can give u inspiration to shoot. especially, if you have been waiting to shoot that particular figure even since it was announced. So by all means, do your shopping when you feel uninspired! even a simple effect parts or a piece of accessory can get that creativity pumping again.
STUCK
“life must go on, move on”
akira jo
what if you have an idea and then as you worked on it, you get stuck? what to do? just like above, take a rest. Or sometimes, leave it and move on and come back to it when you are feeling fresh. Feeling sorry for that epic set up that you have already done, so? take it off the desk, and move on. You can always recreate that set up within half the time you previously did, because you already know where to place certain things.
Sometimes, that work needs a little bit more work and a little bit more care but we are so into it, we can no longer see it. Best thing to do is to leave it, review the work, see what you like or don’t like about it, then sleep on it. As your mind is clearer and you are feeling fresher, sometime you are able to work on it with a different perspective and sometimes that is really what you need. All you need to do is do not post it yet until you are happy with it.
“It is ready when you feel that you have done the work to the best of your ability”
akira jo
I got asked recently as of when do i think that the work is ready to be posted? how long should i work on it? well, take all the time you need to work on it. The timing is really up to you, but if you felt that is the best that you can do at that moment, it is ready. If you do not feel the shot, then it is not ready. The answer is really is up to you, as you grow as an artist, your standard will go higher anyway, so it is different for everyone.
“Do it for yourself”
akira jo
There are times when i felt that i really did a great job, but then when i posted it, the response was underwhelming. But it is ok, because that is the best that i can do and if there is anything that i missed or could do better, i just see it as lesson learned. It is important that when you create your work, that you do not do it purely for the sake of how people see it. You need to do it for yourself, because just because a certain shot that does not have all the attention due to the nature of the shot, such as a shot of a character that no one knows about, it does not mean that your work is not good, just means that not many people understand or resonate with the picture. The most important thing is that the shot or the work is well done and it is of a great standard.
Just because someone’s Spider-man shot is better received than yours, sometimes it doesn’t mean that your work is of lesser quality. Rather it just means that, Spider-man is a more popular character than the character you just take a pic of. For example, Marvel/DC characters will always be better received than Kamen Rider, reason being, the former just more popular and have bigger fan base than the latter. So, don’t let that bother you and made you feel stuck or frustrated, when i first started Ultraman shots, almost no one was doing Ultraman shots, i did not care, i just do it cos i was inspired by the character.
When i posted this shot, it was underwhelmingly received on social media, but it doesn’t matter for me. This is a very well done shot and it is what i wanted to portray that is the King of Fangire on his throne inside his castle. Poses are natural, the lighting is great and so is the staging. But i understand that not many understand who is the dude sitting on the throne nor where he is.
So, there it is guys. I hope this helps whenever you feel stuck or uninspired or even frustrated, i have been there before and i am sure everyone have experienced it and you are not alone.
Ulanzi and lume cube are fantastic addition to the lighting game in terms of toyphotography. These bright little cubes are fantastic because they are versatile, they can be placed anywhere as they are small and also their range are not wide but rather focused and hence it is actually providing a different use to the main light such as the soft box or whatever it is that you use as your main lights.
These cubes are best used to create cinematic lighting or moody lighting, because of their size, they can easily be manipulated in terms of placement and angle of the lights. You can place them anywhere, hidden inside the set or outside the set.
Whilst these cubes should not be replacing your main lights, it is very useful and can be a substitute whenever you wanted to create something dramatic and moody, where you don’t need the set or the subject to be evenly lit.
This shot uses ulanzi/lume cube behind the the door and a soft white light at the font just to balance and light up jerry enough to resemble a dark room. The contrast of lighting use here makes the shot interesting and the lighting from the door directs the light to the cheese, thus highlighting the cheese. Notable, the whole set is not fully lit and the lighting definitely is not evenly lit.
RAY OF LIGHT
Ulanzi L1 and Lume cube has proved to be useful when i am to create ray of lights. To create ray of lights, you will need atmosphere such as atmosphere aerosol or fog machine and a strong focused light (which is the lume cube or ulanzi l1). These can easily be replaced by air purifier or even deodorant, whichever works for you.
By utilising the window, i was able to create a ray of light pointing towards the subject as he is posing after his transformation. The ray of lights here added to the mood of the shot and really without it the shot will be less interesting. Ulanzi L1 or Lume cube is being used and angled downwards to achieve the angle that i needed to highlight the subject.
“Lit that shit up!”
akira jo
Effect parts
These lights are perfect for lighting up effect parts too, due to the nature of their strong focused light, it is essential for effects parts or accessories to be properly lit up, sometimes the brighter the better. LIT THAT SHIT UP!
Both lume cube and ulanzi L2 now comes with barndoor and snoot accesorries which is very useful when you need your light to highlight just a certain part. Very useful for lighting up effects.
Effect parts here is lit up properly and added value to the shot.
These lights does not have a great range of coverage as they are a bit like a torch, the range is not disperse and hence, you can not rely using it as your main light for let’s say a daylight scene outdoor or even an outdoor setting where you are required to evenly lit your set. if you need it for something, you must combine it.
You can find Ulanzi here https://www.ulanzi.com?aff=359 ( i think they have a sale today and tomorrow, 10/11 of september 2021)
A ‘light painting’ technique is an image that is created by capturing a long exposure of a dark scene that contains a moving light source. Light painting can be used as a filler light and to draw something on the frame.
It’s a convenient technique that many photographers have used as their main lighting method. One popular method is to use long shutter speed and using your phone screen as your main source of light, this is very convenient and you don’t need any sort of lights whatsoever. All you need is actually a good stamina if you wanna take a lot of shots, as you will be circling your phone around the figure while lighting it up. I think the following video i did can perhaps explain it better. Why use your phone? your phone screen produces an extremely soft light which is what we want! your phone is your best friend when it comes to use this technique.
Having only one source of light will have it’s own limitations, but as a start? That is good enough option and a handy technique to master.
“Plenty of Patience and Steady Hands required”
akira jo
Another thing that light painting can be used is yes, creating effect beams! Such as the following the picture, the concept is the same and you needed to do is have the right light and move it resembling a beam. It is a bit tricky cos you need it to be straight and precise; hence, you need a lot of patience and steady hands. Again, i think a video could be the best way to explain it.
As most of you who are familiar with my work, will noticed that i love using my TV as my background when creating my display or set up. The reason being is that i can change my background to suit my display with ease as i can experiment taking shots with different background to see how it looks like.
“Background is part of your scene or set-up”
akira jo
The right background will really help in selling and completing the set up. The advantage that the TV gives is that you get to experiment with more ease and as well you can zoom in or zoom out to help with the scaling, to give the set up more depth. When the background blended properly with the display, it is really a satisfying sight to behold. Background is part of your scene or set up and hence it is a very important part of your set up.
This Spider-man shot actually only consist of a bit of roof top props and the rest are completed by the background. Without the right background, the shot will not have any depth and i will not be able to replicate the city scape.
Because you are now able to have a wide range of background accessible on the net and you can change it easily, as opposed to have it printed. You will now have a versatile tool in creating your display without really needing a whole set of dioramas. Some will term this as digirama or digital diorama, where you placed a couple of accessories or none at all and just mainly using your TV or background to create your scene.
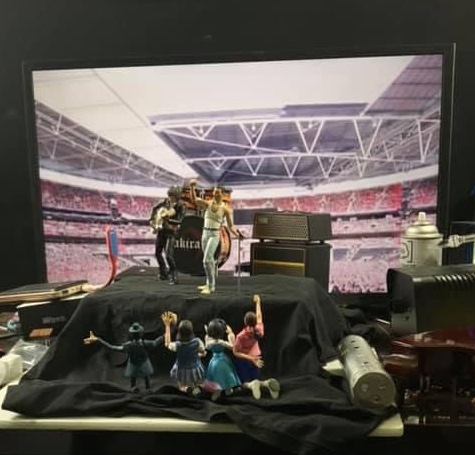
This shot is done by just having a couple of items such as the drum set in front of the tv to recreate a stage. The foreground is actually a bunch of random figure with their hands up. Again, the background blended perfectly and helps selling the illusion of a concert stage. But i had to be creative and do my research which background will work. Behind the scene of the shot
“The journey of a thousand miles begins with a step”
akira jo
As you noticed, background just like everything within your set up actually requires the same amount of care and must be strategically used because it needs to blend with your set up. Blending is the actually the main challenge when using a TV as your background, so your creativity and knowledge will always be required and tested. There are many times where you have the perfect set up but your background just would not blend, be it because of the lighting or because of the colour. Your lighting knowledge must really be up to par when you want to use TV as your background, because TV is another source of light and hence, it actually make it more complicated to properly light up your scene.
So, first thing you need to do is always lower the brightness of your tv and your light must be stronger than the light of the TV used. In theory, to blend it means you need to adjust your lighting to mimic the background and that means you will need a lot of light and you most likely needs to be versatile with your lights. Sometimes, that can be very frustrating and very time consuming, but once it comes through, it is satisfying. Remember, the journey of a thousand miles begins with a step.
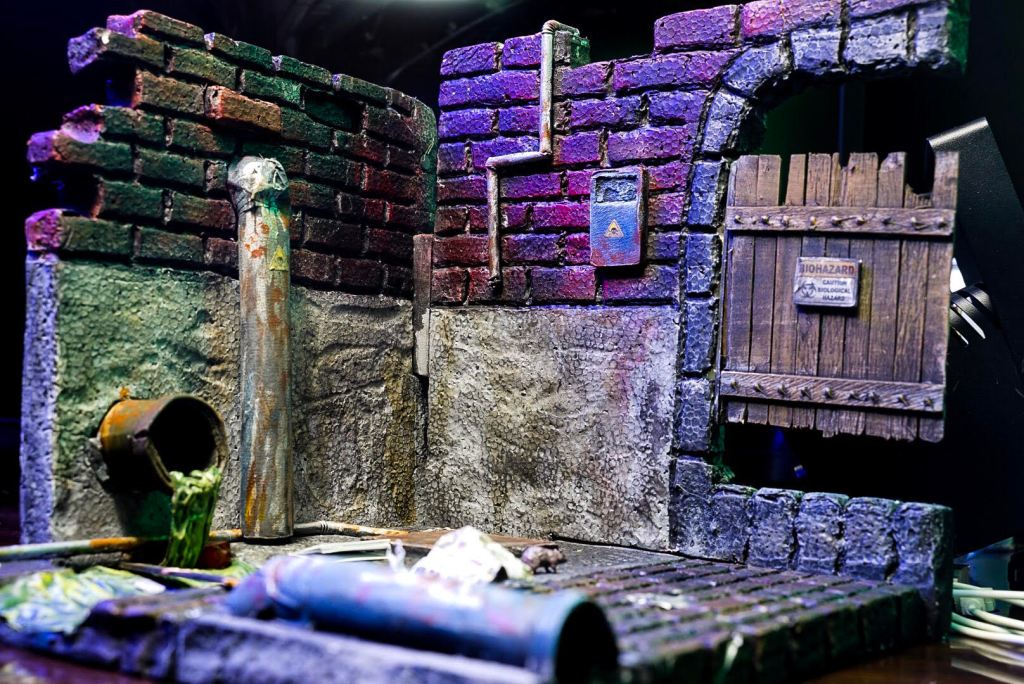
I had an idea of creating the world’s greatest detective following a lead down to the sewer, so i prepared a few of my sewer dioramas and start to create the scene that i wanted to create. The challenge would actually be how to mix these dioramas to create more depth and make the picture to be more dynamic.
“A coal polished into diamond”
akira jo
Since these diorama pieces are very small, i knew that i will not be able to produce the scene i wanted unless i mess around with them and start to combine them. Like working on a puzzle, a few minutes messing about with the pieces, i come up with almost what i had in mind. Starting something like this, i always knew its going to take time and thus, i always give myself a bit of time when creating something like this because this display will be reviewed and tempered with until i am happy with it. I think creating pieces like these is like starting with a coal and you keep polishing it until it turns into a diamond, definitely give yourself all the time you need.
I needed depth and something that resemble a sewer, so i used on of the floor as the wall and added a few pieces of accesories placed strategically to give my display a better hint of the story. So i placed a few skulls of human remains as well as a piece of cloth near the drain and placed it as my foreground. The idea i had is actually Batman hunting down Croc, who lives in the sewer and consume human.
This part will act as the foreground and as the object batman will see and interacts.
Now that it started to resemble a proper sewer, i needed to choose the best angle so it shows what i wanted and as well selling the whole scene better. Then i start to fix batman’s posing before we start setting up the lights.
Here its good, but not good enough, it is still lacking in something and colours could be better. Also i think i can add more depth to this. So, i practiced what i preached by taking more time in polishing the display.
” Sometimes you just need to sleep on it”
akira jo
Here you can see an extra layer at the back is added but its not clear enough and colours are not yet popping. So it means, i have to keep going with tinkering, at this point, i remember i was already getting tired and frustrated. So, i just leave the set up on my table overnight and i will then come back to it with a refreshed mind and of course, i reviewed what i have done and thought of what needed to be done to further refining this particular display, sometimes you just need to sleep on it.
Many shots and adjustment later, i have come to a display that i liked. I added some fog to help with the atmosphere added a bit of colour to the display and i really like how this turned out to be.
for me this pic is the best version for me, as the skulls and the rats and the sewer was properly highlighted and the colours are popping and most importantly, the figure is also properly lit. The staging sort of act as a frame for batman as well and the depth is really there and i think overall this is a decent work of set up. What do you think?
Equipment used: custom Batman classic mezco 1/12 by @nosferatu_custom diorama sewer 1 diorama sewer 2 camera : Sony a7, lens Tamron 28-75mm f/2.8
There has been a long argument whether tangible or non-tangible being the best. For me, since everything that i do is tangible, i would say, both have their merits and it should not be something that is necessarily better but more like it’s more like something that you can choose, you can even be both, doesn’t matter. no one cares.
“It doesn’t matter”
akira jo
It does not matter if your work is either tangible or non-tangible, what works is that the picture produced is of the highest quality. With that i mean, your posing is on point, your lighting is on point and your set-up is on point. These basics are the same whether you are tangible or non-tangible.
If your basics is not sound, your work will not be of your best quality anyway. Photoshop can not fix a badly posed figure, badly placed accessories. Whatever your style is,these basics are very important and should not be neglected. Most of the time,these basics are ignored and most focusing on that fire blaze or that explosions, this will hurt your progress in the long run.
Take an example of this heavily edited picture of mine, explosions not where it should be, posing could be better and overall it looks like a mess, really.
While non-tangible will have it’s advantage in being able to polish their display even further by adding things that tangible artists will have a problem doing, such as realistic fire, realistic water, sparks and so on. But the tangible have their advantage in being more adaptable and more focusing on little things to perfect their set-ups, they are forced to create new techniques to overcome their limitations, as such, most their basics are most likely better polished than the non tangible ones. And sometimes, simple shots do not need to be edited anywway
For example, this simple shot do not need any editing at all. But instead, poses are perfected including those not on focus. Placements of the figure are strategically done and also the lighting. In this shot, the basics needs to be strong.
But the most important thing is mutual RESPECT. Respect meaning that have a look at the culture where you post, if you post on a tangible group, be respectful of the culture of the group. Do not try to say your work is tangible where it clearly isn’t, that is insulting and even worse if you are just trolling.
Giving out criticism in a constructive manner within an environment where it is ok to do so, do not mean a lack of respect towards the artist, if anything it is because the honour is given to the artist that people actually took their to dissect the shot.
Hating its tangible or non-tangible because it is not your style is just a form of insecurity. So insecure of your work, you have to troll and hating other’s work, is one way of stopping your progression. Example, making posts or comments on how tangible toyphotography is a backward thing and not utilising whatever technology is available now is just pure hatred and jealousy. The same as tangible artist saying that all photoshopped shots are bad, which it isn’t.
“Walking into a theatre and expecting a movie”
akira jo
However, if you post on a tangible board such as ACBA and people are commenting on how it can be done tangibly, that should be respected because you are at a group where tangibility is held high and is of the code of the group. Getting annoyed at that, is like walking to a play theatre and complaining that it is not a movie, simply makes no sense.
So, whatever you choose, it is your choice but don’t be forcing your way to others. And yes, taking a shot of a figure badly posed on a desk and badly lit then put it on photoshop, still means that its a badly posed and badly lit and badly composed piece.